Monday, November 30, 2020

Ornaments 2020

Every year I make Christmas ornaments for my grandchildren and here are the ones for this year . . .


The idea is to build up a collection they can take with them when they grow up and move out.  Their first Christmas trees in their new homes will already have some built-in memories to make things cozy and familiar.


Kid’s Ornaments

Cardstock:   Love Nicole Rainforest, Neenah Conservation Cover

                     White, Generic Scraps Green, Purple, Silver, Gold           

Dies:              Birch Press Simple Joy, Marisol Ornament, Ornament 

                        Basics;   

Box:              Papertrey Ink Bulk Mail Envelope                       

Doo Dads:    Gold and Silver fibers        

Thursday, November 26, 2020

Explore

This was one of those happy romps through a creative adventure with various ideas for backgrounds, interesting embellishments, and fun colors . . . 


The only problem was that all of the elements were separate and there was no unity of design.  I had no idea what to do to tie them all together.   After trying a number of small additions, I stumbled on the idea of the large tree. 

Inserted into the vase it now looks like a large houseplant and becomes a very sizeable component which overlays much of the rest of the design and makes it work, at least to some extent.  I think if the branches and leaves had been thicker and filled in more space, it might have even been better.  But I am happy with having learned that something large can overlay a design filled with small elements and will work to unify them.  

I plan to use this trick again!

Cardstock:   Simon Says Fog, Strathmore #100 Bristol Vellum        

Stamps:       Technique Junkies Travel Documents, Deep Red

                     Grunge Borders, Creative Mode Dot Border, KaiserCraft                    

                     Marble, Postoids: Rubber Trouble Roma, Hero 

                     December Mark, Starving Artist Positive Words: Explore

Inks:             Hero Black, Distress Pine Needles, Mustard Seed,

                     Hickory Smoke, ColorBox Silver

Emb Pwdr:  Unknown Silver Sparkle

Dies:            Mama Elephant Femme Frames, Memory Box Grosgrain

                     Ribbons, Arboscello Tree, Elizabeth Craft Ribbons 1, Kaiser

                     Craft Tribal Strips, Frantic Stamper Deckled & Torn Edgers,

                     La La Land Stitched Ribbon, Impression Obsession Vase Set  

Emb Fldr:    Taylored Expressions Weathered

Doo Dads:    Silver Thread, Inkssentials Enamel Accents: Black     

Monday, November 23, 2020

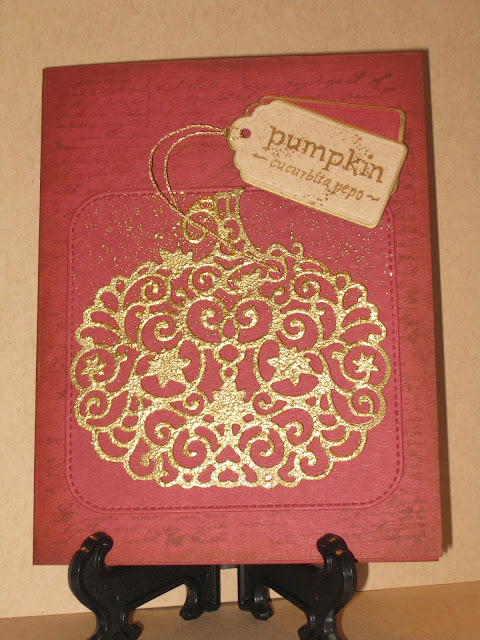
Pumpkin

After three days of struggle with a neat layout idea that I thought would work, it was time to admit that the stars were not aligned and I needed to start over again . . .


 . . . so I did.  My one trick to pass along to you is about getting an intricate die cut like the pumpkin to take the ink and then the embossing powder evenly.  My first attempts to ink the pumpkin prior to embossing left a lot of un-inked areas due to the uneven surface of the Bristol cardstock.  So I used a lovely liquid metallic colorant to first paint the pumpkin a lovely brass/gold color.  I then inked the pumpkin with a brayer and gold ink, and then scattered on the embossing powder.  Because of the gold paint, any areas that were missed will never be noticed.


Cardstock:   Unknown Burgundy, Marcos Jute, Strathmore #100 Bristol            

Stamps:       Technique Junkies Travel Documents, Impression

                     Obsession “Pumpkin”, Purple Daisy Sand

Inks:             ColorBox Gold, Distress Brushed Corduroy

Colorants:    Jacquard Pinata Brass

Emb Pwdr:  Ranger Gold, WOW Gold Rich Ultra High

Dies:            Cottage Cutz Filigree Pumpkin, Bo Bunny Nested Terrific

                     Tags, Gina Marie Stitched Rounded Squares               

Doo Dads:    Gold fiber, Pilot Marker Gold          

Thursday, November 19, 2020

Dream

Happily, I continue to be drawn to dried die powders for backgrounds . . .


 . . . I just can't stay away from those gorgeously intense colors!  The results are great for every type of card you'd want to make.  The best part about using these powders is that you never know exactly how it's going to turn out.  SURPRISE!  And that is a good part of the fun! 


Cardstock:   Strathmore #100 Bristol Vellum, American Crafts Glitter

                     Paper Gold

Stamps:       Technique Junkies Travel Documents

Inks:             Hero Black, Pilot Marker Gold

Waterclrs:    Lindy’s Stamp Gang Magicals Tibetan Poppy Teal,

                     Luscious Lime, Cosmic Shimmer Rich Gold

Emb Pwdr:  WOW Metallic Rich Ultra High Gold

Dies:            Tim Holtz Stitched Rectangles, Reverse Confetti

                     Wild Words: Dream          

Doo Dads:    On the Surface Fibers Gold, Stickles Aqua


Monday, November 16, 2020

Fleur

I usually reach for the vellum when I want a muted or light and airy feel.  But I tried something else this time and learned how to get another look . . .


I die cut a piece of medium weight vellum and placed it over dark cardstock I had cut with the same floral die.  The result was a linen-crisp, very white look of vellum that still kept its fresh and delicate personality.


Cardstock:   Bazzill Rain Forest, Strathmore Ultimate White,

                     Unknown Vellum   

Stamps:       Hampton Art Splatter, Unknown Fleur

Inks:             ColorBox Frost White, Distress Peeled Paint

Emb Pwdr:  Judikins White Diamond

Dies:            DieNamics Stitched Mini Scallop Rectangle,

                     Spellbinders Layered Poinsettia                   

Doo Dads:    Gelly Roll Clear Star, Inkssentials Enamel Accents White      


Thursday, November 12, 2020

Journey

This is for my dear friend and stamping buddy Carol and I'm really pleased with how it turned out!  It might be on the very short list of cards I've made that I actually love . . .

Tim Holtz's new Leaf Print started things off - I die cut the images into the background layer and then overstamped it with my new favorite background:  Technique Junkies Travel Documents.  I didn't press very hard as I wanted the appearance of texture more than I wanted clarity.  Postoids were added into a few open spaces, the edges were sponged for contrast, and I then finished with some black gesso spatters.

I had fun with dried dye powders for the underlying layer.  The die cut layer was then propped up with foam tape in order to make the leaf shapes more prominent.  Kudos to the new slimline format for giving us extra space to play with!

PS:  To avoid any unfortunate misunderstanding, the "Lefties Rule" postoid is not a political statement.  Rather, it refers to being left-handed, which both Carol and I are!


Cardstock:   Marcos Jute, Strathmore Bristol Vellum  

Stamps:       Technique Junkies Travel Documents, Renaissance

                     New York postoid, Rubber Baby Lefties Rule postoid,

                     Rubber Trouble London postoid, Hero December Mark,

                     Unknown Journey

Inks:             Gina K Amalgam Black

Colorants:    Lindy’s Stamp Gang Magicals Hag’s Wart Orange,

                     Rudolph’s Nose Red, Yellow Rose of Texas

Dies:            Pink Fresh Slim Stitched Rectangles, Tim Holtz 

                    Leaf Print                 

Doo Dads:    Studio Gesso Black

Monday, November 9, 2020

Memories

 Tim's new Leaf Print  die set is one of the most versatile sets I've ever used . . .


Each leaf has two die shapes in order to cut a solid backing or just the veins.  The inner shapes can be cut from different colors and re-inserted back into the vein shapes: I did this with the purple section of the orange leaf, and with the green section of the yellow one.  One blogger arranged several of the vein-topped leaves and then added a number  of just the vein die cuts for a light and frothy filler.  Gorgeous! 

 Of course, the solid backing can be colored any way you like and then the matching vein piece can be glued on top.  The intricacies of the veins are what really attracted me to this set and I plan to have a lot of fun with it!  

Stay tuned . . .


Cardstock:   Marcos Jute,   

Inks:             VersaMark, Distress Brushed Corduroy

Waterclrs:    Nuance Purple, Jade, Raspberry, Yellow, Ken Oliver

                     Color Burst Orange

Emb Pwdr:  Ranger Gold

Dies:            Tim Holtz Leaf Print, YPP Craft “Memories”, Verve

                     Charming Banner          

Emb Fldr:    Spellbinders Bricks & Bark

Thursday, November 5, 2020

It's Your Day

Susi is my exceedingly dear and lifelong friend - a true sister of the heart.  As we're on opposite coasts, I remain everlastingly grateful for email so that we can stay in touch.  She is enamored of dragonflies, so I always have extra fun making her birthday card because I think they're beautiful too . . .


I thought it would be fun to reverse the usual color scheme by putting blues and purples on the background and keeping the dragonflies a mystical white.  The crackle paste picked up the colors nicely and the camera even showed some of the glitter.  All in all, I'm rather pleased with how this one turned out . . . I hope you like it too!


Cardstock:   Stedner Bright White, Strathmore #110 Bristol     

Stamps:       Hampton Text Borders, Stampin’ Up “It’s your day”

Inks:             Hero Cup O Joe, Distress Stain Chipped Sapphire,

                     Dusty Concord

Emb Pwdr:  Vippies Transcendence

Dies:            Fyore “Stitched Stamp-edged Rectangles”, Love, Nicole

                     Dragonfly, Frantic Stamper Dragonfly Pair, Cottage Cutz,

                     Nested Stitched Scallop Square Set              

Stencil:        Dina Wakely Jungle

Doo Dads:    Studio 490 Embossing Paste White, Inkssentials Enamel Accents White   

Monday, November 2, 2020

Happy Birthday

There's a happy discovery I made with this layout and I am crossing fingers that the camera will pick up on it so you can see what I'm talking about . . .


 There are lots of times when I want to use glitter in a minimal way and that can be  tricky to do.  But I got lucky with this card.  The secret?  I used spray adhesive to fasten the open-work die cut panel to a solid backing.  Spray adhesive lands everywhere - even on the inner edges of a die cut panel.  So, after attaching it to the solid backing, I scattered glitter all over the front, pressed down to adhere, and brushed off the excess.

Voila!  Most of the die cut edges have the merest edging of glitter which makes the card front shimmer in such a beautiful way.  I hope you can see it . . .

 FYI:  the white butterfly folder opens up to show the words "Happy Birthday".

 Cardstock:   Bazzill White, Neenah Desert Storm, Coventry Rag

                     #140 White, Stampin' Up Vellum        

Inks:             Hero Pool, Stone Wash

Dies:            Troyal Room Happy Birthday Butterfly and text, Tonic

                     Budding Vine, Memory Box Cascadia Butterfly Trio,

                     Isabella Butterfly & Butterfly Wreath (butterfly bodies)

Doo Dads:    Sparkle & Sprinkle Fantasy Gold