Monday, January 29, 2018

Soar, Discover, Achieve

It's hard to tell how much of the shimmer the camera will pick up - even after I got the flash fixed . . .


 . . . but I'm hoping that the sparkle and glimmer on this grey, white and silver card will show up.  One simple way to add interest on a layered card is to take a glitter pen and run it around the edge of the layer.  The thickness of the cardstock keeps your pen right on track and the result is a quietly beautiful accent that doesn't compete with the rest of the layout.

Cardstock:   American Crafts Grey, Strathmore Bristol, Embossing Arts
                       Momi paper: Silver, Vellum   
Stamps:        Tim Holtz Halftone, Time to Stamp Grunge, Angel Co Curls
                        & Swirls, Starving Artistamps Positive Words
Inks:               Distress Iced Spruce, ColorBox Silver
Emb Powder:   WOW Silver Sparkle
Dies:              Memory Box Wrapped Stitch Rectangles, Paper Smooches
                       Butterfly Duet
Doo Dads:  Gelly Roll Clear Star

Thursday, January 25, 2018

Journey

I love banners - how come I haven't used any lately?  Until now, that is . . .


Three different texture stamps seemed to work well together, and coloring the leaves green instead of red means I can use this poinsettia die at any time of the year.

Cardstock:   Bazzill Leapfrog, White, Strathmore Soft White,
                        Bazzill White
 Stamps:      Tim Holtz Pine, Impression Obsession Birch Bark, Love
                        You to Bits Dotted Mist, Unknown “Journey”
Inks:             Vivid Olive, VersaFine Onyx Black, ColorBox Black
Colorants:    Tombow #98 Avocado, #126 Light Olive, Marvy #15
                        Olive green
Emb Powder:   Distress Black Soot
Dies:            Mama Elephant Femme Frames, Bold Banner, Memory
                        Box Poinsettia Ribbon
Emb Folder: Quickutz Sketchbook
Doo Dads:    Inkssentials Enamel Accents Black , Wink of Stella Clear        

Monday, January 22, 2018

It's Your Day

There's just something extra special about green, white, and black that always 
draws me in . . .


Toss in an ombre-style color arrangement and I'm a happy stamper!

Cardstock:   Bazzill White, Bazzill White, Leapfrog     
Stamps:       Stampin' Up "It's Your Day!"
Inks:             ColorBox Black
Colorants:    Impress marker #72 Camel, Tombow #126 Light Olive,
                        #847 Crimson, #993 Chrome Orange, #55 Process Yellow
Emb Powder:   Judikins Detail Black
Dies:            White Lotus Metal frame, We-Buys Cute Chrysanthemum,
                        DieNamics Basic Stitch Lines 
Doo Dads:    Wink of Stella Clear

Thursday, January 18, 2018

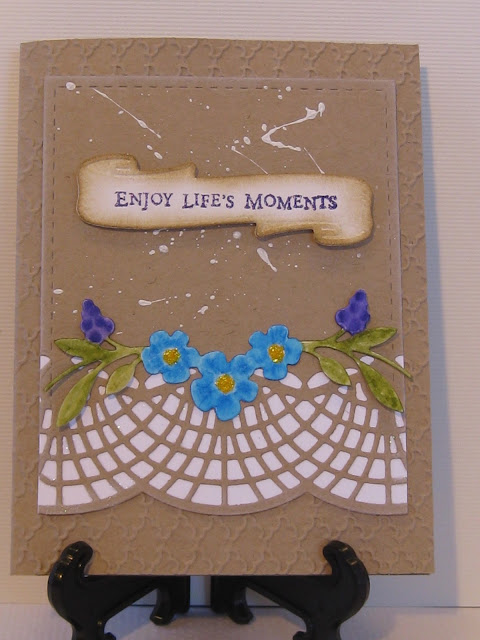
Enjoy Life's Moments

My love affair with Kraft cardstock will never end . . .

                         
But the fun thing on this card is the spattered background.  At the 5:53 mark in this  video by Kristina Werner, I learned of a great new spattering technique to use, and with a product I'd never bought before.  It's gouache, an artist's watercolor paint.  It contains pigment and is "designed to be used with opaque methods of painting", says Google.

As I'm always on the prowl for  a white medium that is truly opaque, I was delighted to find that gouache really works!  I need to practice my technique a little more in order to consistently achieve dots instead of streaks, but I quite liked the artless splatter I got with this first attempt.  Best of all, all of the dots and streaks are a truly opaque white and so firmly textural, they will not have any trouble in the mail.  I'm hooked!

Cardstock:   Marcos Jute, Strathmore Soft White         
Stamps:       Hero Moments
Inks:             Distress Brushed Corduroy, VersaCraft Peony Purple
Colorants:    Tombow marker 98 Avocado, 476 Cyan, 606 Violet,
                        993 Chrome Orange
Emb Powder:   Stamp a Mania Peony Purple
Dies:            Spellbinders Bella Clair Border, Floral Berry Accents,
                        Lil Inkers Stitched Mats: Rectangles           
Emb Folder: Stampin’ Up Fancy Fan
Doo Dads:    USArt Quest Effectz: Opal Essence, Winsor Newton 
                           Gouache White, Sparkles Buttercup           

Monday, January 15, 2018

Thank You

Today's post is a two-fer, so be sure to scroll down to the second card . . .

I decided to make this year's Christmas Thank You notes on the quietly subdued side with some classic shapes and colors . . .


The tag is from a cleverly designed die that cuts just part way down the sides.  This allows you to make a tag of any length that you want.  You can even score a few folds and turn this basic shape into a folded booklet.  Check out some of the ideas here . . .

Cardstock:   Bazzill Buckeye, Strathmore Bristol   
Stamps:       Judikins Esponge Background, PSX Stenciled Rosebuds Flourish
Inks:             Distress Antique Linen, Brushed Corduroy
Emb Powder:   Ranger Gold, Distress Walnut Stain
Dies:            Elizabeth Craft Tags & More 3: Leaves, Savvy Thank You
                        Cursive, Memory Box Cascadia Butterfly                     

Here is another take on the same basic design . . . 

         
 Cardstock:   Bazzill Buckeye, Strathmore Bristol   
Stamps:       Judikins Esponge Background, PSX Stenciled Rosebud
                        Flourish
Inks:             Distress Antique Linen, Brushed Corduroy
Emb Powder:   Ranger Gold, Distress Walnut Stain
Dies:            Elizabeth Craft Tags & More 3: Leaves, Savvy Thank
                        You Cursive, Memory Box Butterflies: Cascadia, Pippi,
                        Isabella                       

Thursday, January 11, 2018

Sending You the Happiest

My love affair with stripes will likely never end . . .


 . . . I think they go with just about everything!  In this case, a lacy-edged overlay and some perky fruit and flowers ought to brighten up anyone's day, don't you think?

Cardstock:   Strathmore Ultimate White
Stamps:       My Favorite Things Diagonal Stripes, The Stamp Doctor
                        Basket, Simon Says Stamp Sketchy Banner Greetings
                        “Sending you the happiest”
Inks:             VersaFine Onyx Black, ColorBox Black
Colorants:    Tombow markers #476 Cyan, #993 Chrome Orange,
                        #847 Crimson, #636 Imperial Purple, #Avocado, Zig
                        marker Pure Black
Emb Powder:   Distress Black Soot
Dies:            Heartfelt Creations Regal Borders and Pockets, The
                        Stamp Doctor Basket, Spellbinders Floral Berry Accents,
                        Simon Says Stamp Sketchy Banner Greetings 
Doo Dads:    Ranger Enamel Accents Black

Monday, January 8, 2018

Happiness

Some ongoing fun with water-based markers and my water brush . . .


One of my new favorite tools to use is a texturizing tool known by a variety of names, one of them being "skwuncher".  Googling this will avail you nothing, so don't even try.  This tool is a really coarse plastic sponge that is more air than sponge.  You can buy them as is or mounted on a piece of doweling.  The handle makes it very handy and easy to use.

I keep it on my desk and like to use it when an inked area looks a little flat and in need of some added interest - such as the flower heads in this case.  I dab the skwuncher directly onto an ink pad and tap it onto the image. On this card, I used the darker of the two ink colors that were used to color the flower heads.  The results are very subtle, but I think they add just that little something that can make the difference.

Cardstock:   Neenah Desert Storm        
Stamps:       Carabelle Edges In My Journal, Stampin’ Up “Happiness”
Inks:             Distress Brushed Corduroy
Colorants:    Tombow #98 Avocado, #847 Crimson, #993 Chrome Orange
Dies:            AliExpress Border Leaves, Memory Box Butterflies:  Pippi,
                        Isabella, Prim Poppy, Cheery Lynn Expandable Quilling
                        Strip, Stampin’ Up Victorian Tags 
Doo Dads:    USArt Quest Crystal Effectz Opal Essence, Maya Arts jute         

Thursday, January 4, 2018

With Sympathy

For the time being, I am enjoying a very simple water coloring technique, using water-based markers and my water brush . . .


While my troublesome camera may not show it, the color is softly blended with no harsh lines - something I usually have difficulty in pulling off.  Working one leaf at a time, I laid down one line of color next to the bottom edge of the leaf, and then I simply added water with my water brush to the whole leaf as per Jennifer McGuire's video in my post of last week.  The color moves wonderfully well and blending/shading almost take care of themselves!  It's so simple to do that calling it a technique is almost pretentious.

While watercolor paper is your safest bet, other cardstocks can be used as long as you don't work the area too much and cause pilling.  As always, experiment!

Cardstock:   The Paper Cut Eames White, Bazzill Raven, Beckett
                        Moonlight       
Stamps:       Stacy Fern, Stampin’ Up Itty Bitty Backgrounds, All Night
                        Media “With Sympathy”
Inks:             ColorBox Black, Hero Black
Colorants:    Tombow #98 Avocado
Emb Powder:   WOW Black Puff
Dies:            Gina Marie Stitched Rounded Squares, DieNamics
                        Horizontal Stitched Strips                   
Doo Dads:    Offray 1/8” satin ribbon Cream     


Monday, January 1, 2018

Hello

Recently, Jennifer McGuire posted a wonderfully easy way to get a terrific watercolor look in just two steps.  Check out the video here and give it a try . . .


On watercolor paper, stamp an image having enclosed spaces within, such as with mosaic or stained glass patterns.  In my sample, I used segmented leaf images.  Heat emboss to create "walls" that will help enclose the generous amount of water you'll be using. I found that UTEE gave me the most reliable results as it made the walls higher than regular EP would.  With any water-based marker (brands differ:  test first to make sure the color moves easily), pick a section and draw a line alongside one of the embossed lines.  Use your water brush to flood the section.  Let the water do the work!  No blending is necessary and you'll get almost an ombre look with no effort at all.

This has instantly become my all-time favorite watercoloring technique!  LOTS more to come, for sure . . .

Cardstock:   Bazzill Kachina, The Paper Cut Watercolor paper,
                        Designer paper  
Stamps:       Judikins Four Leaves, Stampin’ Up Itty Bitty
                        Backgrounds
Inks:             VersaMark, Brilliance Gamma Green
Watercolors:   Zig Clean Color Green, Light Green, Yellow Green
Emb Powder:  UTEE White
Dies:            Spellbinders Long Classic Scalloped Rectangles Large,
                        DieNamics Basic Stitch Lines, Savvy Hello
Doo Dads:    Wink of Stella Clear