Monday, September 30, 2013

Hexagon #3

I’m taking a Hexagon Hiatus after this one . . .


 . . . this mini hexagon series has been fun but I haven’t been wild about any of the results.  So it’s time to take a walk in a different direction and start playing with another shape.  I still love hexagons – just maybe not right now . . .

Cardstock:         Generic textured White, Navy
Stamps:              Stampin’ Up ‘Many thanks’
Inks:                    ColorBox Frost White, Webbing Spray Silver, Gelly Roll White pen                                   
Emb Powder:    Judikins Opaque White 
Dies/Punches:   Papertrey Ink Happy Hexagons, Marianne Creatables
                                  LR0248 Flourish, Spellbinders Small Scalloped Octagons          
Doo Dads:          Pearls

Thursday, September 26, 2013

Butterfly Duo

Ever since I organized my Scrap Stash into a compact and easily retrievable system, it’s been a pleasure to dip into it and see if there’s anything I can use on a current project.  The answer is almost always a resounding “YES!”  and I love the jumpstart this gives my creative processes!


Except for the card base itself, this entire card was made from scraps and leftovers.  I don’t suppose I’ll live long enough to use up every last scrap I’ve got, but this sure slows down their relentless expansion into the living room.

 While I have a larger flat box to keep my 8.5x11 background papers in, I needed a handy arrangement for my smaller scraps.  What’s my system?  It’s a no-frills idea involving a generously-sized decorated photo box from ACMoore and a collection of large-ish (7”x12”) glassine bags saved from previous purchases of clear stamp sets.  I’ve sorted everything by individual colors, and have a “Multi-Color” bag to hold scraps having several colors.  The bags are stiff which allows the labels to be upright and easily visible.  I kept the flap at the top so that it would be easy to insert scraps as they accrued.  When it’s playtime, it’s a simple matter to pull out a bag or two and take them to my worktable as needed.

I have some die cuts and specialty scrap papers stored at the front for visibility.  Along the right side, there are a handful of sandwich bags, each with a varied collection of scraps whose colors work well together.  Every so often, I take out one of these bags and put everything in it on a card.  There isn’t much room for these sandwich bags which is exactly the point:  it’s a fail-safe method for keeping the stash easy to USE!   Hope you find these ideas useful . . .

Cardstock:                     Marcos Jute, Beckett Iceberg
Stamps:                          Hero Arts Zig Zag Background
Inks:                                Distress Barn Door, Broken China, Dusty Concord,
                                           Frayed Burlap                   
Dies/Punches:               Cheery Lynn Lace Corner Deco B, Small Exotic Butterflies #1,
                                             Die-Versions Hint of Lime Alpha, Die-Namics
                                             Accent It Labels & Tags
Impression Plate:        Cheery Lynn Cement
Doo Dads:                     Distress Stickles Antique Linen

Monday, September 23, 2013

Hexagon #2

OK, here we are back at Hexagon Place for our second attempt at making a successful layout with this iconic shape . . .


I like the soft colors, including the touches of Kraft, for which I am always a sucker.  Popping up some of the hexagons really helped bring some additional and much-needed dimension to this layout.  However, I still think I’ve got a ways to go until I arrive at a truly appealing arrangement.  Onward, ever onward . . .

Cardstock:      Beckett Moonlight, Marcos Jute, Generic Linen Teal
Stamps:           Fiskars Mesh brayer, plastic bubble wrap
Inks:                Hero Shadow Soft Brown, Memories Soft Pool, Soft Sage                             
Dies:                Papertrey Ink Happy Hexagons, Savvy Tree, Sizzlets Typewriter      
Doo Dads:       May Arts Jute Twine

Thursday, September 19, 2013

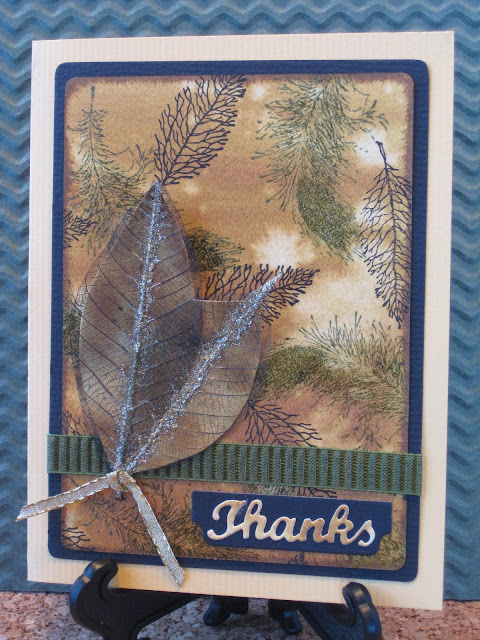
Leaves and Feathers

Since leaves and feathers often have very similar shapes, I saw no reason why I couldn’t put the two together . . .

 
Remember the skeleton leaves that were so popular a number of years ago?  They’re still out there, folks, and they’re still beautiful!  You can brayer them with inks to match your layout – they take the ink beautifully and dry quickly. 

They provide a lot of design impact and next to no bulk for mailing purposes.  As they are not accomplishing anything by languishing in my stash, my new plan is to trot these lovely leaves out on a regular basis. 

 Skeleton leaves are rather delicate in appearance and not all that sturdy, so affixing them flat to the cardstock is probably the best way to use them.  However, if you want to pop dot them for a little elevation, all is not lost:  little undergirding from a piece of cardstock with an unfussy background is in order here.  I had an un-stamped scrap left over from the background so it was pressed into support service for the skeleton leaves.   To attach, turn the leaf over and dot along the midrib with very small drops of glue.  Attach to the backing and immediately blot any excess glue that squeezes through – it will not be noticed once it dries.

 Definitely more skeleton leaf-play is in the works!

Cardstock:       Bazzill Dark Butter, Black, watercolor paper
Stamps:            Club Scrap Feather, Stampers Anonymous Skeleton Leaf
Inks:                   Distress Brushed Corduroy Stain, Stampin’ Up Always Artichoke,
                                  Archival Jet Black                                                      
Emb Powder:   Vippies Transcendence                         
Dies/Punches:  Die-Namics Mini Tabs Quartet, Elizabeth Craft “Thanks”
Doo Dads:        Gold Mica Glitter, 1/8“ ribbon

Monday, September 16, 2013

Asian Vase

The lacy background on this card is cut from one of my all-time favorite dies and I rarely overlook the opportunity to use it.  Although Asian in feeling, it works with just about any layout . . .


While the Tattered Feather and the Grasses are fussy-cut, the cuts were long and straight, very easy, so it went pretty fast.  A couple of pop dots for dimension, and done!

Cardstock:       Marcos Jute, Generic Sage
Stamps:             Good Stamps Stamp Goods Tattered Feather, Impress Grass,
                                  Silver Crow “Thank You”, CC Rubber Stamps Fibers
Inks:                   Distress Peeled Paint, Stampin’ Up Always
                                  Artichoke                                                         
Colored Pencil:  Inktense Tan
Emb Powder:  Vippies Transcendence            
Dies:                   Cheery Lynn Japanese Lace Pattern, Elizabeth Designs
                              Asian Vase, DIE-Namics Accent It Labels & Tags                     
Doo Dads:        May Arts Jute twine


Thursday, September 12, 2013

Thanks

Currently, I seem to be locked in a grateful mode and as it’s a nice place to spend some time, I think I’ll stay here awhile!  This particular Thank You card requires a little explanation . . .

 
Allan is our computer guru, and in the several years we have been fortunate to have his services, he has pulled off some amazing computer coups that have kept us up and running with a minimum of hassle.  With Allan on board, I no longer have to fight the urge to grab a hammer when the computer malfunctions:  I know that Allan is at the ready and will be over ASAP to put things right again.

A few years ago, he had my tower’s electronic guts spread out all over the desk and when everything got updated and reinstalled in perfect order, there was a bundle of colorful wires left over which I thought were pretty.  So I put them aside for future use.  As of today, the future has arrived!

On his last visit, Allan got my downstairs craft room laptop and my upstairs office computer talking to each other and I never dreamed such a huge convenience would be possible.  So I felt a Thank You card coming on . . . also a golden opportunity to use some of those saved wires.

 Hope it makes him smile!

Cardstock:       Marcos Jute, Brown Bag, Bazzill Black, Generic Oatmeal, Corrugated
Stamps:             Simon Says Stamp Banner Sayings, Hero Formula Fun
Inks:                   Archival Jet Black, ColorBox Black, Ancient Page
                                Coal                                                          
Emb Powder:  Stamp-a-Mania Desert Wind 
Dies/Punches:   Simon Says Stamp Folded Banner      
Emb Folder:     Quickutz Triangles from their Linear set
Doo Dads:        Wiring left over from my computer tower makeover

Monday, September 9, 2013

Thank You

I wasn’t really sure where I was going when I worked on this, and now that this card’s journey is over with, I’m not at all sure that it has reached a worthy destination.   One minute, I like it – the next minute, I’m saying “What?  Are you kidding me?


This was one of those deals whereby I added an element, it didn’t quite work, so I added another one on the opposite side to balance it.  That didn’t work either, so I topped both problems with yet another “solution”.  An X-Ray of this card would reveal a number of layers, all of which were unsuccessful. 

This attempt to hang on in the face of terminal fumbling reminded me of my early experiences with learning how to water ski on the Colorado River.  When you’re a rank beginner and you wipe out on skis, it’s instinctive to hang on to the tow bar in a misguided attempt to get back to being upright.  After you drink half the river and possibly lose a major part of your bathing suit, it eventually occurs to you to let go.  Perhaps that’s what I should have done with this card. 

In any event, my Scrap Stash has several pieces left over from taking my brand new hexagon die on its early maiden voyage.  As I really love the hexagon shape, my plan is to play with these classic cuts and see if I can do any better than I did with this card. 

Tsk . . . so much drama.  This explains why stamping is never boring!

Cardstock:       Marcos Jute, Generic Black, watercolor paper
Stamps:            Creative Catalyst Tweed Border, Fiskars Mesh Brayer
Inks:                   Archival Black, ColorBox Gold, Adirondack sprays in Pesto, Bottle,
                                  Lettuce, Ancient Page Coal, Hero Soft Brown Shadow, Gelly Roll
                                  pen Metallic Gold
Emb Powder:    Ranger Gold, Judikins Detail Black    
Dies/Punches:  Die-Namics Leafy Flourish, Hero Alphabet Upper Case, Papertrey
                                 Ink Happy Hexagons

Thursday, September 5, 2013

Asparagus Redux

I have lusted after the Inktense watercolor pencils for nearly two years.  I love how vivid they are on Kraft cardstock and also how easy it is to get a watercolored look when coloring and then using a water brush on top.  So when I came across the opportunity to get the full 72 piece set for half price, I sprung!  To heck with buying food and paying the rent . . .

The problem was storage – I’ve long since run out of desktop real estate, so I needed something handy but portable.  The ends of the pencils are color-coded which makes them ideal for horizontal storage, but this would never work for vertical storage as I would never store any pencil tip down.  Also, as some of the color coding is dark, it’s hard to tell the colors apart when they’re all grouped together.  Dividing them up by the eight color families seemed the best solution.  So I haunted the dollar stores looking for slim, tall-ish square glass containers.  I came up empty. 

Then I remembered that canned asparagus comes in narrow, tall cans and so my problem was solved!  These are narrow enough to take up minimal space, yet with plenty of room for future colors to be added (let’s have some more yellows and oranges, please!).


We ate asparagus every day for a week, after which I peeled off the labels and washed the cans.  I diecut felt circles to use on the inside bottoms of the cans which keeps the tinny noise level down.   Then I cut up eight different black and white designer papers, applied Crafter’s Pick Incredibly Tacky Glue with a brayer for even coverage, and put these on the cans, starting at the center of the paper and working outwards.   For even easier color identification, I glued strips of colored cardstock to cover the seams, and diecut scalloped strips from the same colors to go around the tops and hide the metal rims.  Except for the felt bottoms, I decided against fussing with the interiors – way too anal even for me.

Lastly, I diecut colored butterflies to cover the seam from the scalloped strip and add some lighthearted whimsy.  Then I happened upon the perfect-sized wooden box which I gessoed in black, painted with black acrylic, and then stenciled on some butterflies on all four sides with molding paste.  The whole arrangement is lightweight and very easy to take from its nearby home and set it on my desk for some serious fun with colored-pencil-watercoloring!

 
Cardstock:                     Pre-printed papers, various colored scraps
Inks:                                Gelly Roll Clear Star                                                   
Dies/Punches:               Memory Box Butterflies Isabella, Pippi, Spellbinders
                                              Standard Circles, Sizzix Decorative Strip Dots & Scallops
Doo Dads:                      Dreamweaver stencil Oriental Butterfly, Felt (used on the
                                              inside bottom of the cans), American Traditional
                                             3-D Molding Paste

Monday, September 2, 2013

Checkmate

It’s birthday time again for my husband and that means a chess-themed card for sure . . .

 
The fun on this one comes from the off-white checkerboard on the left:  I did it with a stencil and modeling paste.  It was quite easy – like frosting a cake but without the calories! 
This is a good thing . . .

Cleanup was quick and easy and after the squares were dry (about 20 minutes), I dabbed over them with Distress Antique Linen in order to better fit into my color scheme for the card.  The texture is very nice, lightweight, and not a bulky problem when it comes to mailing. 
More of this lies ahead indeed . . .

Cardstock:                        Bazzill Raven, Marcos Jute, generic Black, Designer Paper
Stamps:                            Stamp Camp Distressed Checkerboard, Art Impressions
                                                Chess King, Whispers Checkerboard
Inks:                                  Distress Embossing Ink, Antique Linen, Brushed Corduroy,
                                               PaperTrey Ink Fresh Snow
Emb Powder:                   Distress Black Soot, Transcendence Clear
Dies/Punches:                 Hero & Die-Versions letters, Spellbinders Lace Doily Motif,
                                              Punch Bunch Scalloped Square, ¼” corner rounder
Stencil:                              American Traditional Patterns 2                            
Doo Dads:                        Golden Light Light Molding Paste