Monday, November 28, 2022

Thinking of You

How I love making layered butterflies . . .


 . . . I think vellum gives the most ethereal effect.  The problem is that while I want the top layer to be raised and look floaty, the post office is not going to let that happen – through no fault of their own.  Formerly, I have lifted the wings and paper clipped them together to get them out of the way.  I’ve then squeezed a drop of clear dimensional glue like Glossy Accents at the base of the wing and right next to the butterfly’s body.  This works, but then I have to wait a few hours until it dries.

This morning, it occurred to me to use a rolled up clear glue dot instead.  I lifted the edge of the glue dot with the tip of my craft knife and touched it to the rest of the dot.  Removing the dot with the knife finished the rolling and I put it under the wing and alongside the body.  It worked perfectly – I had to really look to see the rolled dot through the vellum.  At most, it looked like a very light shadow, which I noticed only because I was examining it closely.

Whether I use vellum or any opaque cardstock, this is now my new go-to method, especially as I no longer have to wait for any liquid glue to dry.  Love that!


Cardstock:   Bazzill Lemon Tart, Beckett Iceberg, Stampin’ Up vellum       

Stamps:        Stampin’ Up Thinking of you, Prickley Pear Butterflies

Inks:               ColorBox Frost White, Black

Emb Pwdr:   Hero White, Judikins Detail Black

Emb Fldr:      Taylored Expressions Brick

Dies:              Tim Holtz Tattered Banners, Prickley Pear Butterflies           

Doo Dads:    Yellow floss, black pearls, black glitter, American

Crafts yellow grosgrain ribbon     

Thursday, November 24, 2022

Wish Big

This one was a struggle . . .


 . . . and then I added the clouds in the sky.  That changed just about everything.  It’s not my favorite layout but it’s surely an improvement.  All the action on the tag needed to be balanced with a little hoo hah above the tag and I think the clouds fixed that.  It’s amazing how many times something dimensional can settle an unsettled layout!


Cardstock:   Bazzill Red Devil, Beckett Iceberg         

Stamps:        Stampin Up Wish Big!, Lil Inker Balloon Builders

Inks:               Distress Chipped Sapphire, Barn Door, Mustard Seed,

Weathered Wood

Emb Pwdr:   Judikins Detail Black

Dies:              Threetols Net Backgrounds, Lil Inker Balloon Builders,

Cloudy Sky            

Doo Dads:    American Crafts grosgrain ribbon Yellow

Monday, November 21, 2022

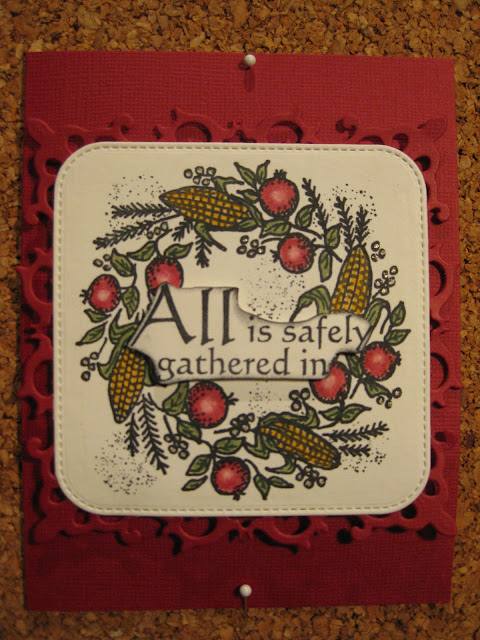
Safely Gathered

I’m a sucker for wreath images.  I’ve collected several in both stamp and die form and happily, this is the time of year to trot out at least a few of them . . .


Although the design is intricate, the coloring went much quicker than I thought it would.  That’s because I used Gamsol and it smoothed over the colored pencil areas almost immediately.  That wonderful stuff is magic!


Cardstock:   Bazzill Pomegranate, Beckett Candlelight        

Stamps:       B&J’s Art Stamps Corn & Pomegranate Wreath,

Impression Obsession “All is safely gathered in”,

Purple Daisy Sand

Inks:             Superior India Ink Black

Colorants:    Caran d’Ache Luminance Pencils Crimson Aubergine,

Moss Green, Orange, Green Ochre, Gelly Roll Clear

Dies:            Gina Marie Stitched Rounded Squares, Spellbinder

Fleur de Lis Squares       

Doo Dads:    Gamsol        

Thursday, November 17, 2022

Thinking of You

This card is the maiden voyage of my newest toy:  Tim’s Watercolor Pencils!

I strongly recommend going to his blog and watching his 2.5 hour video on the remarkable properties of these pencils.  Time very well spent . . .


There are so many ways to use these and get great results.  The background on this card was done by misting (once) the stamp and then coloring on it.  For really intense color, I dipped the pencil tip into my water jar for two seconds and then drew with it.

Stay tuned – there are way more experiments to come!

Cardstock:   Bazzle Bazzil Green, Strathmore Mixed Media #90,

Stampin’ Up Vellum

Stamps:       Hero Scattered Leaves, Purple Daisy Sand, Unknown

Thinking of You

Inks:             Superior India Ink Black

Colorants:    Distress Watercolor Pencil Rustic Wilderness,

Peeled Paint, Crushed Olive, Distress Pine Needles

Emb Pwdr:   Vippies Transcendence

Dies:            Lil Inker Stitched Mats Rectangles, Memory Box

Stitched Rectangle Trimmings, We-Buys Cute Ovals,

                      Elizabeth Craft Small Butterfly                

Monday, November 14, 2022

Hope

When a former co-worker was hit head-on by a drunk driver, she wound up lucky to be alive.  Her numerous breaks have been enhanced with a bunch of titanium rods and she’s looking at a long period of recovery.  A message of peaceful hope was what she needs to have . . .


Stamper Extraordinaire Wendy Vecchi did a tutorial quite awhile ago that showed how she spreads embossing paste onto a card front, stamps into it with a text image, and then when dry, she sprays it with a dye ink.  This gets into the nooks and crannies of the text and makes a really neat effect.  If you want to try this, be sure to lightly mist your stamp before putting it into the paste.  This makes for an easy release and will give you a sharper image.  Then, wash the stamp immediately – use an old toothbrush to do a good job quickly and easily.

I love how it turned out and this technique has earned a spot on my Top Ten list of favorite methods . . .

Cardstock:   American Crafts White, Strathmore #90 Mixed Media

Stamps:        Judikins Celtic Background

Inks:               Distress Peeled Paint

Colorants:    Stamp Zia Chroma Spray: Olive

Dies:              Memory Box Arboscello Tree, Frantic Stamper Slimline

Frames Set: “Hope”                   

Doo Dads:    Dreamweaver Translucent Paste 

Thursday, November 10, 2022

Celebrate

Here is the fourth and final sample I made from the wonderful collection of brass stencils I was gifted with from Joyce Kurtz, owner of The Peddler’s Pack . . .


I kept it simple and let the variegated metal leaf do the talking.  A sliver of gold glitter paper and a brass charm finished this layout. 

I had a ton of fun playing with these stencils – thanks so very much, Joyce!


Cardstock:   Metallic cardstock Red, American Crafts Glitter Paper

Gold, Strathmore Pastelle Bright White 

Colorants:    Houston Art Metal Leaf Variegated Red 

Dies:              Lil Inker Stitched Mats Rectangles, TK Online Celebration

Set: Celebrate,    

Stencil:          Dreamweaver Birds with Holly

Doo Dads:    Deco Foil Gel Duo, Gold charm

Monday, November 7, 2022

Bless

The intricacy of this third stencil from The Peddler’s Pack gave me pause when it came to figuring out how to color it.  But I came up with three happy workarounds I’d love to share with y’all . . .


1. I experimented with putting a 1/8” thick piece of colorless foam against the back of the stencil before topping with the cardstock and placing onto the light box.  The light comes clearly through the foam and the design will be raised higher, due to the resiliency the foam provides.  Pull back just a little on the pressure you apply with the stylus to prevent poking a hole in the cardstock.

2.  Coloring a stenciled image can dent the design somewhat, so I always spread a very lightweight molding paste over the back to fill in the design depressions.  It takes seconds to do this, dries quickly, and the design keeps its shape while I color.

3. My happiest discovery was finding out that Gamsol works on my oil pencils as well as on my Prismas!  The Gamsol smooths out the pencil strokes and when applied with a tortillion, the color is hydrated enough to be easily moved to the edges of the embossing.  It does need to be sprayed with a fixative however to prevent smearing.

Cardstock:   Bazzill Raven, Strathmore Mixed Media #90    

Colorants:    Walnut Hollow Oil Pencils Black, Dark Brown, Burnt

Umber, Raw Umber, Blue Green, Red, Red Violet,

Red Orange, Orange

Dies:             Pink Fresh Mini Slimline Essential Bundle, TK Online

Celebration Set: Bless           

Stencil:         Dreamweaver Swirly Tree

Doo Dads:    Deco Foil Gel Duo, Golden Light Molding Paste,

Metalix Glitter Moondust    

Thursday, November 3, 2022

Soar

After looking at Christina Werner’s video this morning on painting with reinkers, I just had to give it a try . . .


Her method was to heat emboss a large pattern onto watercolor paper and then mist or brush on some water to make it easy for the inks to move.  I then squeezed a few drops of three different inker colors onto a smooth surface.  I picked up each of the colors in turn with a wet paintbrush and applied them in various areas over and around the image.  I daubed and smooshed until I got the soft-edged effect I was after.

However, when I apply inks over a heat embossed design, some of the ink always clings to the embossed surfaces, even though they supposedly are not compatible.  So for a crisper look in future, I will paint with the reinkers first, dry them thoroughly, and then heat emboss the image.


Cardstock:   Bazzill Jade, Nicole #140 Premiere Watercolor

Stamps:       Gloria Page Spread Your Wings

Inks:             Ancient Page Aegean Blue, Leaf Green, Amethyst,

Color Box Silver

Emb Pwdr:   Delafield Silver

Dies:              Papertrey Ink Angled Labels, DieVersions font 

                      Noodles                  

Doo Dads:    Metalix Glitter Moondust