Thursday, February 29, 2024

Cheers

Lydia Fiedler of Splitcoast Stampers published another one of her marvelous techniques recently and I was hot to give it a try.  

Here is the first of four results . . .


While time for drying has to be allowed, the actual doing is quick and easy.  I like to do the first three quick-and-easy steps the night before and then I’m ready to proceed the next morning.  Here’s the process:

1. Attach a piece of aluminum foil to a piece of cardstock with double-sided sticky tape.

2. Insert into a 3D embossing folder and run through your die cutting machine.

3. Cover the whole design with a thin layer of Gesso and let dry.  Vary the direction of your brushstrokes as these will show when dry and provide interesting texture.  Tiny glints of the foil will show through when the Gesso is dry – this adds to the fun for sure!

4. Wearing gloves (unless you’d like to have inky pinkies for a week), drizzle on your choice of alcohol ink colors, tilting the paper to let them spread.  Spritz with alcohol if desired to move and blend the colors.  Let dry.

5. Brayer with a contrasting color of paint to bring out the highlights of the design.

5. Trim to size and finish your card.

Liquid alcohol inks are ordinarily translucent – but as Lydia states, the layer of white Gesso makes them opaque!  This gives you rich color you wouldn’t get otherwise. 

I’ve three more samples on the way – prepare yourselves . . .

Cardstock:   Bazzill Typhoon, Strathmore #100 Bristol Smooth,

Ranger Alcohol Ink Cardstock Silver Sparkle    

Inks:             Adirondack Alcohol Ink Eggplant, Denim

Colorants:    Deco Art Titanium (Snow) White

Dies:            Simon Says Butterfly Tendrils, Cheers             

Emb Fldr:     Tim Holtz 3D Kaleidoscope

Doo Dads:    Perfect Pearls mist Silver 

Monday, February 26, 2024

Celebrate

My explorations with OLO alcohol markers continues . . .


It’s true that the choice of cardstocks does make a lot of difference, especially when it comes to blending.  I used X-Press for this card and will be trying Taylored Expressions’ Sugar Cube as soon as it arrives.  Meanwhile, more practice is certainly on the menu, but I’m happy to note that my results with OLO’s are far better (and easier to obtain) than they ever were with Copics.

Cardstock:   Bazzill Dark Denim, X-Press-It     

Stamps:       Stamp La Jolla Satin Flower Square

Inks:             Gina K Amalgam Black

Colorants:    OLO Alcohol Inks Royal Purple, Hyacinth, Blueberry,

Violet, Butterscotch

Dies:            Spellbinders Hem Stitch Squares, Impression Obsession

Congrats Word Set 

Doo Dads:    Glass Glitter Lemon Yellow

Thursday, February 22, 2024

With Sympathy

Given the somber subject, I usually like to keep colors on the soft side . . .


  . . . so I chose textured Kraft paired with a few gently colored flowers.  I used Prisma colored pencils with Gamsol to delete the wax and help with blending.  A bit of shimmer to add interest and I think we’re done.


Cardstock:   Marcos Jute 

Stamps:       Mama Elephant Stems and Sprigs

Inks:             Gina K Amalgam Black, Gelly Roll Clear Star

Colorants:    Prisma True Blue, Muted Turquoise, Parma Violet,

Walnut Hollow Blue Violet, Schwan Aquarellable

8043 Dark Green

Dies:            Mama Elephant Stems and Sprigs, Impression

Obsession Mid-size Frame, Elizabeth Craft With

Sympathy   

Emb Fldr:     Taylored Expressions Weathered

Doo Dads:    Gamsol, Judikins Microglaze       

Monday, February 19, 2024

Thinking of You

Had a little experimental fun with this one . . . this card was my maiden voyage with OLO markers.  They cost about the same as Copics but you get twice the ink!  The ink delivery system is uniquely efficient and instead of only about 65% use of what’s in the barrel, you get as much as 92% use!  The ink flow is noticeably smoother and it’s so much easier to cover an area without unwanted overlaps that deepen the color.  I’m definitely sold!


Another idea I tried was to cover the flower centers with clear plastic raindrops.
  I wanted to attach them with my ThermoWeb glue dots as they are very strong.  I knew that my smallest size of glue dot was still bigger than the raindrops so I decided to add some glitter to cover the sticky overage.  For a change, the camera actually managed to pick up some of that sparkle so I hope you enjoy the effect.

The background is spattered with both black and white gesso which has added a really neat texture.  I don’t think it’s visible, however.  Sob . . .

Cardstock:   Bazzill Pear, Strathmore #140 Watercolor        

Stamps:       Yvonne Albritton Wild Roses, Crafter’s Companion

Get Well Soon

Inks:             ColorBox Black

Colorants:    OLO Alcohol Markers Evergreen, Forest Mist, Red

Grapefruit, Vermilion, Copic Toner Gray No. 1,

Colorless Blender

Emb Pwdr:   Judikins Black

Dies:            Wonky Stitch Rectangle Stax                 

Doo Dads:    Kat Scappiness Sparkling Clear Droplets, Sparkle

& Sprinkle Glitter Fantasy Gold       

Thursday, February 15, 2024

Celebrate

This one was a three day struggle – and I still don’t like it . . .


I know it has something to do with the colors (which I changed numerous times) but I never seemed to get to that sweet spot where I was reasonably content with the results.  I’m sending it out anyway – phooey!

I did try something new, however:  on the black solid butterfly, I wanted to add glitter but only under the openings in the gold butterfly overlay.  Here’s how I did it:

1. Die cut the solid black butterfly.

2. Die cut the intricate overlay out of masking paper.

3. Add the masking paper overlay to the black butterfly.

4. Spray with adhesive.

5. Peel off the overlay and dust with glitter, pressing down firmly to adhere.

It worked perfectly which does give me some satisfaction about this card . . .

Cardstock:   Strathmore #140 Watercolor, Bazzill Green, Hanko

Momi Washi Gold  

Inks:             Tattered Angels Gold Glimmer Mist

Emb Pwdr:   Ranger Gold

Dies:            AlteNew Striped Leaf, Spellbinders Leaf, Impression

Obsession Congrats Word Set: Celebrate, InLoveArts

3D Butterfly (body only)             

Doo Dads:    Black glitter  

Monday, February 12, 2024

Wild About You

I thought Valentine’s Day would be the perfect time to dig into my printed pink and red papers and make up a slew of Bay Window cards.   All eight of the cards are different – scroll down to view two of them . . .


Happy Valentine’s Day!

Cardstock:   Bazzill White, Pear, Pomegranate, Light Rosy, Salmon,

Scraps Assorted     

Stamps:       Inky Antics “Wild About You”

Inks:             ColorBox Black

Emb Pwdr:   Judikins Detail Black

Dies:            Papertrey Ink Doily Details          

Doo Dads:    Stampendous stickers Circle Silver        


Thursday, February 8, 2024

Cheers

As with Monday’s post, I’ve used the spraying technique on another intricate die cut to provide a different look . . .


The butterfly was originally quite glittery and I felt it needed to be toned down for this layout.  So I experimented with sponging on some dark green dye ink.  As dye inks aren’t permanent on metallic surfaces, a spray of fixative took care of that little problem.  I did decide that a little gold glitter on some of the flower centers would add just the right amount of sparkle . . . I’m sure that as usual, the camera will remain indifferent to it all, but in real life, I got just the effect I was after!

Cardstock:   Strathmore #140 Watercolor, Bazzill Spring Breeze,

American Crafts POW Glitter Paper: Gold        

Inks:             Adirondack Color Wash: Sailboat Blue, Sunset Orange,

Meadow, Distress Forest Moss

Dies:            Hero Flower Garden, Spellbinders Wonderful Wings,

Impression Obsession Flags, Cheery Lynn Cheer                 

Doo Dads:    Viva Paper Pen Gold        

Monday, February 5, 2024

Cheers

Today’s card shows another look at some recent fun I had with color sprays.  I used two colors, added a spritz of metallic silver, and then die cut the result with an intricate background . . .


After adding spray adhesive to the back, I added the layer to the card front.  Spray adhesive clings not only to the flat surface but also to the cut out edges of the design.  When dusting the front with glitter, a little of it sticks to those sticky cut edges   A soft brush takes off all of the excess glitter but the bits that cling to the edges add just enough gleam to make things interesting.

Cardstock:   Strathmore #140 Watercolor        

Inks:             Stamp Zia Color Sprays: Sapphire, Moss, Perfect

Pearls mist Silver

Dies:            EShocking Fan Background, Butterfly Iron Tulip Flower,

Memory Box Stitched Rectangle Trimmings, TK Online

Celebration Set: Cheers            

Doo Dads:    Viva Pearl Pen Silver Chrome      

Thursday, February 1, 2024

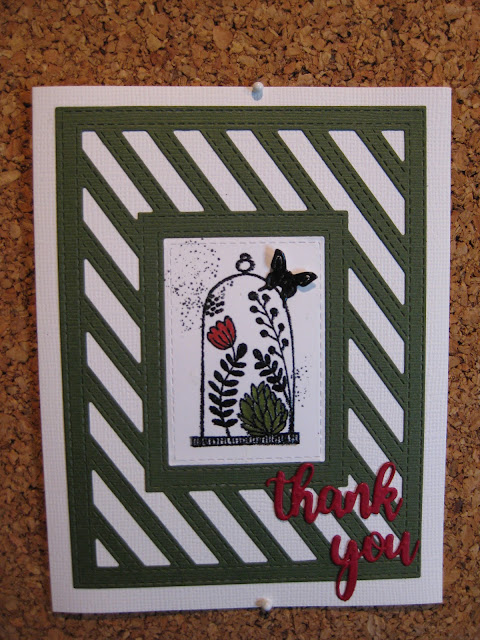
Thank You

Thankfully, I was born into a wonderfully warm and loving family.  When my Favorite Nephew (I have only one nephew) blessed me with a surprise gift this Christmas, a Thank You card was certainly in order . . .


 . . . the fun thing about this layout is that the adorable terrarium image was a Christmas gift to me from his sister, my Favorite Niece – of which I also have only one.  Between the two of them, I had a marvelous Christmas indeed!


Cardstock:   Bazzill White, Rain Forest,          

Stamps:       Savvy Floral Terrarium, Purple Daisy Sand

Inks:             ColorBox Black, Superior India Ink Black

Waterclrs:    Zig Clean Color Geranium Red, Olive Green

Emb Pwdr:   Judikins Detail Black

Dies:            Frantic Stamper Striped Frame & Insert, Marianne

Butterflies, TK Online Celebration Set: Thank you