Thursday, December 28, 2017

Happy

This card shows one of my favorite techniques for creating a textured background that won't overpower focal points that are a little on the 
subtle side . . .


With the same cardstock that I use for the card base, I die cut a detailed woodgrain background and then used double sided tape to keep all the negative pieces in place.  After peeling off the release paper, the layer was attached to the card front.  I think that the woodsy-themed background is the perfect backdrop for the birds and the bluebells. Hopefully, my balky camera will be able to pick up some of the nice texture . . .

Cardstock:   The Paper Cut Brown Umber, Beckett Candlelight       
Stamps:       Local King Chicks set, Hero Frames with Sprigs
Inks:             Distress Faded Jeans, Twisted Glass, Gathered Twigs
Emb Powder:   Vippies Transcendence
Dies:            Frantic Stamper Woodgrain Card Panel, Local King
                        Chicks, Memory Box Branching Out, Hero Frames
                        with Sprigs, Recollections Word Fetti: Happy 
Doo Dads:    Viva Pearl Pen Cream       

Monday, December 25, 2017

Achieve, Soar, Persevere

Birthdays near Christmas often get buried in a sea of red and green.  I've decided to try a different color scheme for this December 22 birthday card.  It's going to a single mother with lots of challenges in her life.  Therefore, it seems to me that encouragement can work for any occasion . . .


The fun thing about this card is its source of inspiration - have any of you taken a good look at boutique Kleenex boxes lately? I've included a picture of the one I used for this card below.  I loved the colors, the design, the two patterns together, and the fact that the artist made her techniques so easy to follow!  She used circular sponging for a soft look and then added slightly more concentrated color and texture by pouncing with a coarse sponge.  Along with some lights and darks, solid leafy images worked to give the scene some depth. 


It was really fun to get a stamping lesson off a Kleenex box!  Time to go hunting for another one . . .

Cardstock:   Bazzill Horizon, Strathmore Soft White, Neenah Emperor,
                        Generic Purple   
Stamps:       Our Daily Bread Chalkboard Lattice Background, Printworks
                        Leaf Pattern, Waffle Flower Layering Marble, Starving
                        Artistamps Positive Words
Inks:             Distress Faded Jeans, Weathered Wood, Broken China,
                        Dusty Concord, Evergreen Bough, Papertrey Ink Fresh
                        Snow, VersaFine Majestic Blue
Emb Powder:   Vippie’s Transcendence
Dies:            DieNamics Rectangle Frames, Spellbinders Signs of
                        Spring 1 (bird), Memory Box Lorelai Leaf               
Doo Dads:    Art Institute Glitter: Aqua from the Floral Collection, Stamp 
                         Oasis Heat & Stick

Thursday, December 21, 2017

Hear the Angels Sing

In an attempt to simply my usual overly-fussy Christmas card production line, I set up two rules for myself this year:  no heat embossing, and the background must be a smooshed one . . .


These were wise decisions:  with over 80 cards to do, there really is a limit as to how much time I can carve out to spend on these.  I think I'll restrict myself in the same manner next year . . . of course, cutting down an overly large Christmas card list would also be helpful.  

Hope that's not too bah humbug-ish . . .

Cardstock:   American Crafts White, Strathmore #90 Watercolor paper,
                        Generic Dull Gold        
Stamps:        Stampin’ Up Shepherds, Neat & Tangled Joyful Sentiments,
                        Above the Mark Abbey Music, Starving Artistamps Retro
                        Mosaic Grout
Inks:               Distress Chipped Sapphire, Faded Jeans
Dies:              Memory Box Star of Wonder, Tim Holtz Labels              


Monday, December 18, 2017

For You

Here's another take on the background of a card I did last week . . .


The tree is double-layered to give it added body and thickness and I used my favorite time-saving method:  I ran one piece of cardstock through my Xyron and stuck it to the other piece.  A couple of passes with the die-cutting machine and the intricate work was done.  After covering with the textured gold embossing powder, it looks like hammered gold metal.

Sorry for the dark picture - I'm having some camera trouble I hope to resolve soon . . .

Cardstock:   Bazzill Admiral, Strathmore Soft White, Generic Dull Gold     
Stamps:       Impression Obsession Greenery
Inks:             ColorBox Gold, Distress Chipped Sapphire, Pine Needles
Emb Powder:   Ranger Gold
Dies:            Memory Box Stitched Rectangle Trimmings, Arboscello Tree,
                        Marianne Banners and Text, DieVersions Hint of Lime 
                        Font                 


Thursday, December 14, 2017

It's Your Day

One of my favorite color combinations to use is  two shades of green paired with any combination of bright colors . . .


 . . . it's such a refreshing, happy mixture that always makes me smile.  I hope it does for you too!

Cardstock:   American Crafts Primaries: Green, Beckett Moonlight,
                        Generic textured White      
Stamps:       Brutus/Monroe Watercolor Background, Art Gone Wild
                        Tiny Bouquet 2
Inks:             Distress Mowed Lawn, Twisted Citron, VersaFine Onyx
                        Black, ColorBox Frost White
Colorants:    Inktense Fuchsia, Fern, Sicilian Yellow, Stabilo #8043
                        (Dark Green)
Watercolors:   Zig Clean Color: Light Green, Green Shadow, Green,
                           Fluorescent Green, Yellow, Carmine Red
Emb Powder:   Sweet Stamps Fine Detail White
Dies:            Lil Inkers Stitched Mats Rectangles, Mama Elephant
                        Femme Frames, Frantic Stamper Woodgrain Card 
                       Panel, Memory Box Stitched Rectangle Trimmings           

Monday, December 11, 2017

You & Me

There was a time when I thought I had to know exactly where I was going with a card's design before I could actually sit down and make it happen.  Those constricted days are long gone, thank heavens.  They were exhausting.  It's a lot more fun to pick an element I like and just run with it . . .


This one started out with a sponged panel in green and blue, over which I gold embossed the leafy background.  The Muse took a little while to produce the other elements (she drags her feet a lot), but they eventually came together very peacefully.  The part I like best is the finish on the gold embossing powder - instead of the usual smooth and shiny look, this powder cures to a textured appearance that looks like hammered gold.  I love it so much that I bought an 8 ounce jar so that I would never run out!

Cardstock:   Bazzill Admiral, Strathmore Soft White   
Stamps:       Impression Obsession Greenery
Inks:             ColorBox Gold, Distress Chipped Sapphire, Pine Needles
Emb Powder:   Ranger Gold
Dies:            Spellbinders A2 Distressed Edges, Memory Box
                        Timberland Collage, Cottage Cutz Birch Trees and Deer,
                        Spellbinders You & Me
Doo Dads:    Pilot Marker Gold     

Thursday, December 7, 2017

Button Tree

Here is a picture of this year's Christmas gift, destined for two of my friends who love and appreciate handmade efforts . . .


The original idea came from artist Shari Carroll who posted her instructions for this stunner of a button tree last December.  I knew right away that this would be my gift choice for this year.  Here is her excellent video on the procedure . . . 

I enclosed both an easel and a Command hanging strip so they'll have a choice as to whether to hang it or display it on a side table.  It was a really fun project to do and I expect I'll be making several more in future . . .

Monday, December 4, 2017

Ornaments 2017

Every year, I have fun carrying on a tradition my mother started decades ago with her two grandchildren:  making ornaments the kids could use through the years, and then take with them when they moved into their own homes.  Here are this year's ornaments for two of my young grandchildren . . .


The addition of die cutting to a stamper's bag of tricks has made this effort a whole lot easier to pull off.  This year's background reflects my current rage:  gilding flakes!  There are scores of great videos showing how to apply these lovely pieces of light:  one of the easiest is to take double-sided tape, apply it to piece of cardstock, peel off the remaining release paper and start adding the flakes.  Cover completely, burnish with your fingers to get the major excess off, and then burnish firmly with a stencil brush to remove the rest of the bits.

A little of these flakes goes a very long ways, and these collections come tightly packed in the jar, so you'll have enough to play with for years.

ORNAMENTS:
Cardstock:   Wausau Firecracker Red, Generic Green          
Dies:            DieNamics Stitched Mini Scallop Rectangle, DieVersions
                        Christmas Word Tree, Punch Bunch Star               
Doo Dads:    Sparkle & Sprinkle glitter Fantasy Gold, Enchanted Creations
                        glitter Moondust, Mark Richards Metals Gold & Silver, Gold
                        and Silver cords 

BOXES:
Dies:            Papertreyink Bulk Mail Envelope, Memory Box Alphabet
                        Soup, Tim Holtz Alphanumeric (numbers)
Doo Dads:    Past Time Stamps Ultrafine Glitter


Thursday, November 30, 2017

Dream, Sparkle

My love affair with gilding leaf continues . . .


I had a scrap left over from a previous card so I decided to overlay it with a spray of bamboo shoots that were also covered with the same gilding leaf.  I strongly recommend doing the leafing before the die cutting:  it's much easier to work with a solid piece of cardstock as opposed to a delicate cut out.

The background was going to be framed with one of the four frames that this one-piece die provides, but I forgot to use the metal plate needed for added pressure when cutting intricate dies.  Therefore, none of the cut out pieces in the frames were cut all the way through, so I decided to leave them in place for a textured look that didn't compete with the bamboo shoots.

There's a lot of glitz and glitter on this card and I'm debating about whether or not to tone some of it down.  We shall see, but for the moment, it's safe from the chopping block  . . .

Cardstock:   Generic Bronze Metallic 
Stamps:       So She Stamps “Dream”, Stampin’ Up “Sparkle”
Inks:             ColorBox Gold
Emb Powder:   Ranger Gold
Dies:            Frantic Stamper Fancy Frames #1, Memory Box
                        Bamboo Shoots                
Stencil:        The Crafters Workshop Mini Cubist
Doo Dads:    Amy’s Magic Leaf Sea Spray, Marigold glitter

Monday, November 27, 2017

So Special

The spectacular background on this card came from a serendipitous incident that Pat Huntoon of Technique Junkies stumbled across one day . . .


Pat calls this technique Stenciled Glittery Gilding Flakes and it's quick and easy to do.  Go here for the 10 minute video on how she did it. 

Here's a quick preview:  remove the liner paper from one side of a piece of double-sided glue tape and stick it down onto a piece of cards stock. Peel off the liner paper and lay a  stencil down over the sticky side.  Press firmly to secure, and spread gilding leaf over all.  Burnish with your fingers, then with a stiff brush.  Peel off the stencil and dust some glitter over the remaining sticky areas.  DONE!

Cardstock:   Bazzill Aqua 
Inks:             Wink of Stella Clear
Dies:            Spellbinders Classic Rectangles Large, DieNamics
                        Pierced Rectangle Frame, Mama Elephant Peek a Frame,
                        Spellbinders Floral Berry Accents, Tattered Lace
                        Everyday Sentiments: “So Special”, Papertrey Ink
                        Angled Labels                
Stencil:        The Crafters Workshop Mini Cubist
Doo Dads:    Amy’s Magic Leaf Sea Spray, Marigold glitter

Thursday, November 23, 2017

I Lift Up My Eyes

When encouragement in needed, it's hard to beat this verse from Psalms . . .


I tried a little 2nd generation stamping here with the mountain image.  After inking the stamp, I stamped it off once lightly and then stamped onto the 
deckle-edged panel.  The text was stamped full strength, and the slightly 
lighter mountain range makes the text pop.  It's subtle but in real life, it does make a difference.

The puffy white clouds were stamped with a marble patterned image which made for a nice wispy design.  They are very white and needed a little balance at the bottom of the layout, so I used a white Prisma pencil to emphasize some of the lighter surfaces in the mountain range.

Lastly, I know that these particular birds are more typically suited to be living at the ocean, but I'm hoping the recipient isn't into ornithology and will be just as pleased with this soaring trio of grace and freedom.

Cardstock:   Neenah Desert Storm        
Stamps:        Our Daily Bread Keep Climbing: mountains and text,
                           Waffle Flower Layering Marble
Inks:               VersaFine Onyx Black, Papertrey Ink Fresh Snow
Colorants:    Prisma pencil White
Emb Powder:   WOW White Puff
Dies:              Impression Obsession Sea Birds
Emb Folder: Taylored Expressions 

Monday, November 20, 2017

Fall

Fall is not my favorite time of the year, but I do love the colors . . .


The happy surprise for me was finding out that watercolors can actually be blended to some extent.  Working with just the right half of the maple leaf, I colored the lower part with Red, and then right away, did the tips with Yellow, continuing down into the Red and back up 2/3 of the way in order to blend.  Then I repeated on the left half of the leaf.  It worked much better than I thought it would.  Maybe I'm beginning to get the hang of this coloring gig after all!

To all who celebrate, a blessed Thanksgiving to each and every one of you . . .

Cardstock:   Marcos Jute  
Stamps:        Hero Autumn, Vippie’s Dotty Snow
Inks:               Papertrey Ink Classic Kraft, VersaFine Vintage Sepia,
                           Distress Gathered Twigs, Ground Espresso
Watercolors:   Zig Clean Color Geranium Red, Orange, Yellow,
                              Brick Beige, Blush
Emb Powder:   Distress Walnut Stain
Dies:              Hero Autumn, Goodculler Stitched Rectangles, Essentials by
                           Ellen Stitches Cover Plate, Impression Obsession Branch,
                           Arich Rounded Corners Stitched Rectangles

Thursday, November 16, 2017

From the heart

I'm working on December birthday cards at the moment and while there's usually a tendency to tie into the traditional holiday colors and images,  I always try to fight that.  People whose personal major events are right next to big holidays deserve to avoid getting lost in the shuffle . . .


So for this December birthday card, I used frosty white leaves touched with gold, some Kraft-colored cardstock to ground things, and a winter butterfly in burgundy and gold.  A little burgundy shimmer here and there, and done . . .

Cardstock:   Bazzill Crimson, Neenah Desert Storm, Strathmore
                           Soft White         
Stamps:        Marianne Banners & Text: “From the heart”
Inks:               VersaMark, Ancient Page Bordeaux
Emb Powder:   Ranger Fine Gold, Vippies Transcendence
Dies:              Sheena Geometric Cutout, DieNamics Falling Leaves,
                           Lil Inker Stitched Mats Rectangles, Elizabeth Small
                           Butterfly, Marianne Banners & Text 
Doo Dads:    The Art Institute Glitter Burgundy  

Monday, November 13, 2017

Explore, Nurture, Treasure

After our North NJ State Fair, I had the distinct pleasure of being interviewed about my work by our local newspaper.  Reporter Kathy Stevens did a wonderful job with the article and I'm hoping it encourages other potential stampers in the area to give this wonderful hobby a try.  During the interview, Kathy shared her love for leaves, so a couple of those were what I used for her card . . .


The treatment with the leaves was my first attempt with a technique Jennifer McGuire re-hashed from an earlier post a year ago.  The easy instructions and both videos can be found here . 

After setting up your die cutting machine to emboss - not cut - dust your piece of cardstock with anti-static powder and set it down on the embossing pad.  Then lightly tap a detailed die with a VersaMark pad.  Lay it down carefully onto your cardstock, being careful to not let it shift.  Roll through, remove the die, and sprinkle with metallic embossing power.  Tap off the excess and heat.  So easy, and so gorgeous!

To keep the leaves puffed up, I applied embossing paste to the backside and leveled it off with my palette knife

I also tried Jennifer's method of embossing with water spatters!  Just use a wet paintbrush and tap it against your finger to distribute the drops.  Then dust on your embossing powder.  The result is a light, lovely, and randomly artsy dispersal. Try it!     

Cardstock:   Bazzill Dark Olive, Marcos Aquarelle, Stedner Bright White   
Stamps:        Starving Artistamps Positive Words
Inks:               Distress Vintage Photo, Rusty Hinge, Festive Berries,
                           Fossilized Amber, Peeled Paint, Shabby Shutters
Emb Powder:   Ranger Fine Gold
Dies:              Prima Forest Leaves, Memory Box Stitched Rectangle 
                          Trimmings               
Doo Dads:    Tulip Glitter Gold     


Thursday, November 9, 2017

Celebrate

While working on a couple of 9" x 12" projects I'm making for Christmas presents, I began wondering if I could translate some of the techniques into a smaller layout suitable for a card . . .


After gluing down some wrinkled tissue paper over the entire card front, I gessoed over the surface and let it dry.  Then I overstamped with a text background, and stenciled with a wonderfully gritty paste.  A few die cuts smooshed with some warm Distress colors, some fibers across the bottom, and I'm reasonably happy with the results . . .

Cardstock:   Strathmore Kid’s Paint Pad, Soft White, tissue paper   
Stamps:        Heartfelt Creations Large Elegant Word Background
Inks:               Gesso, Distress Barn Door, Spiced Marmalade, Mustard
                           Seed, Brushed Corduroy, Walnut Stain, Wink of Stella
                           Clear
Dies:              Tim Holtz Fall Foliage, Impression Obsession Grass, Banners
                           & Tails, DieVersions Hint of Lime              
Stencil:          The Crafters Workshop Mini Tile Texture
Doo Dads:    Glittered twig, various cords, Art Anthology Dimensional 
                         Paste Sandstone

Monday, November 6, 2017

What the?

Here's some more fun with Tim's Crazy Birds:  there are six in the set and I plan to play with all of them . . .


The most exciting discovery I made while working on this card was discovering the joy of Strathmore's Bristol paper.  That stuff is awesome, especially when it comes to moving color around.  The pad cover says that it's not designed for work with water, but you can toss that limitation right out the window.  Its heavy weight keeps it from warping and even after working the water brush extensively, it didn't pill. 

A couple of years ago, I tried coloring with Distress markers and then using my water brush to move the color around.  Mostly, none of the colors budged, even after trying them out on Beckett cardstock and watercolor paper.  But on the Bristol, they moved like a dream.  This method is the way I've always wanted to color and I am so excited to find that it actually works!  The cardstock really does make the difference . . .

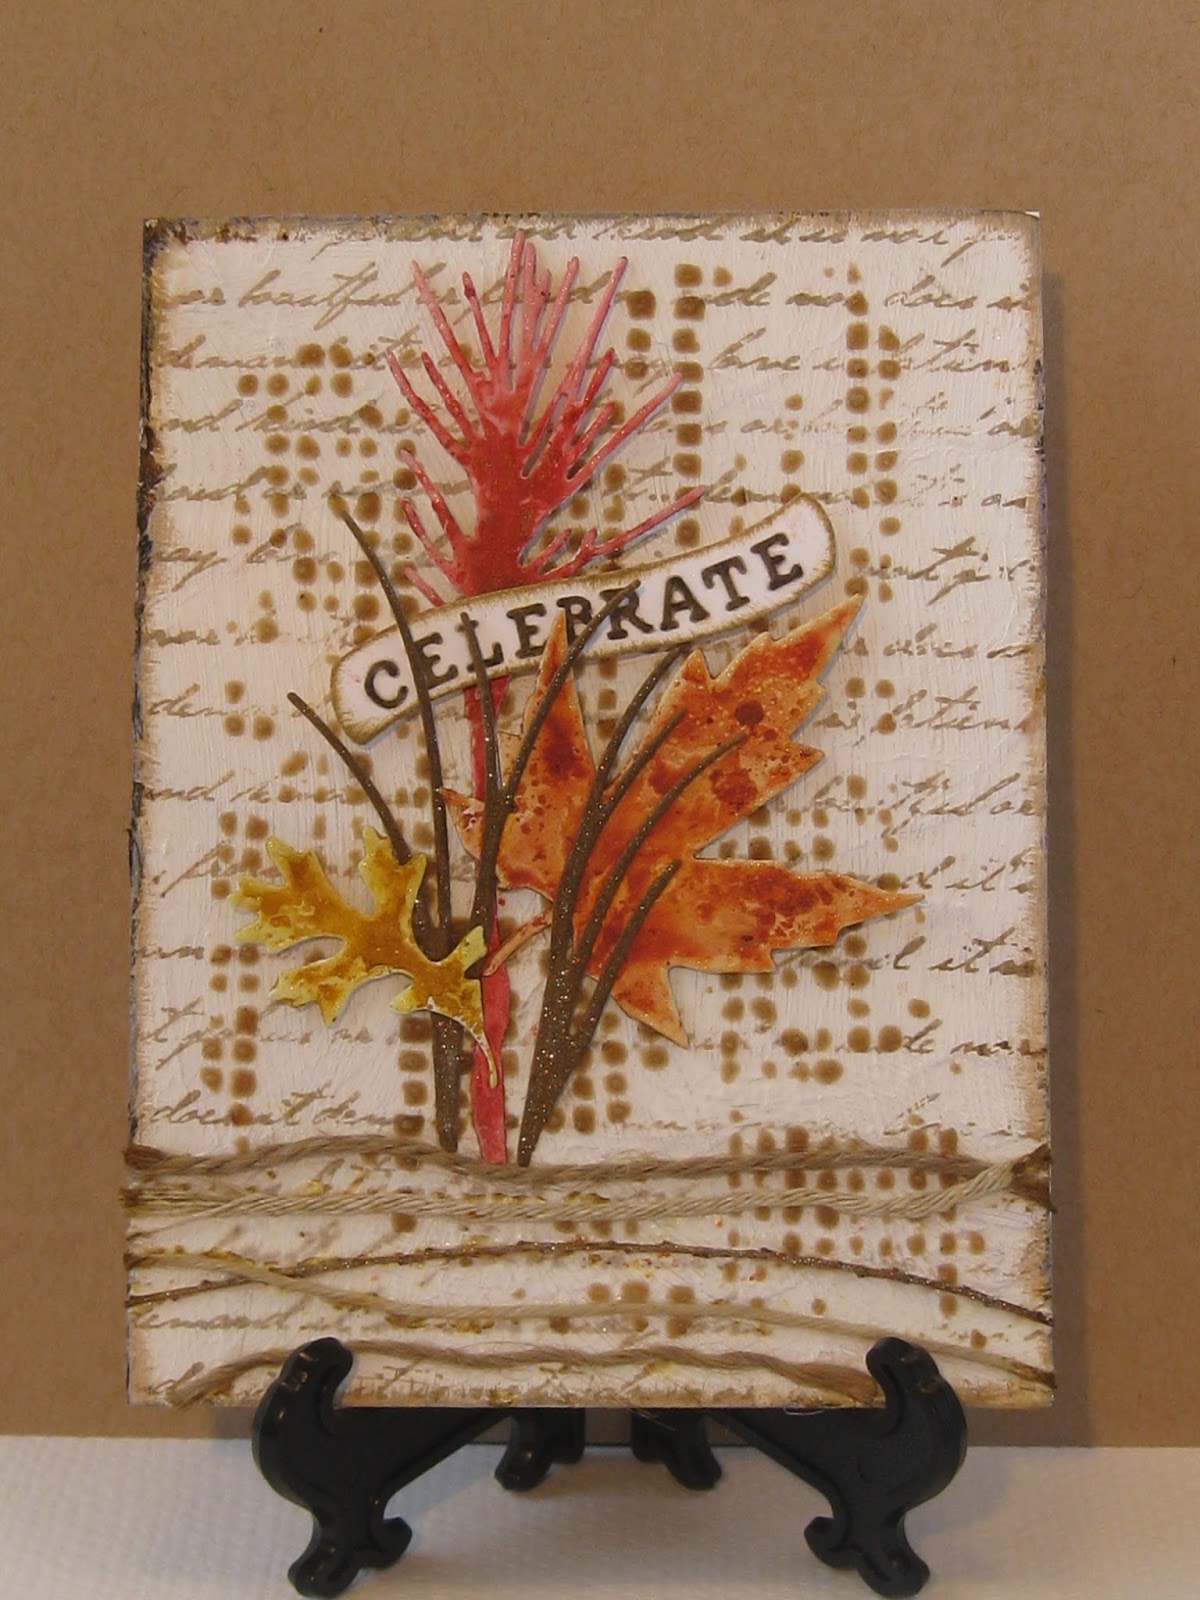
And here's another perky look with a few changes in coloring and 
accessories . . .


The Yellow card:
Cardstock:   The Paper Cut Brown Umber, Strathmore #100 Bristol           
Stamps:        Tim Holtz Bird Crazy, Crazy Talk
Inks:               Distress Carved Pumpkin, Brushed Corduroy, Mustard
                           Seed, Gina K Charcoal Brown, Ancient Page Chocolate,
                           Pine, VersaMark 
Colorants:    Distress Markers Carved Pumpkin, Mustard Seed, Mowed Lawn,
                           Frayed Burlap, Walnut Stain, Antique Linen          
Watercolors:   Inktense Cadmium Yellow, Zig Clean Color Yellow
Emb Powder:   Distress Walnut Stain, WOW Clear Matte Dull
Dies:              Lil Inkers Stitched Mats Rectangles, Tim Holtz Crazy 
                          Things             
Stencil:          The Crafters Workshop Mini Ledger + Golden Light Paste


The Orange card:
Tina’s card:
Cardstock:   The Paper Cut Brown Umber, Strathmore #110 Bristol           
Stamps:        Tim Holtz Bird Crazy, Crazy Talk
Inks:              Distress Carved Pumpkin, Brushed Corduroy, Gina K 
                          Charcoal Brown, Ancient Page Chocolate, Pine, VersaMark, 
                          VersaFine Olympia Green 
Colorants:    Distress Markers Carved Pumpkin, Mowed Lawn, Frayed Burlap, 
                          Walnut Stain, Antique Linen, Zig ColorBrush Leaf      
Emb Powder:   Distress Walnut Stain, WOW Clear Matte Dull
Dies:              Inkers Stitched Mats Rectangles, Tim Holtz Crazy Things
Stencil:          The Crafters Workshop Mini Ledger + Golden Light Paste